

Table of Contents
- Why Smelly Garbage Bins Happen and What You’re Actually Fighting
- What You’ll Need Before You Start
- How to Clean a Trash Can in 6 Steps
- How to Deodorize a Garbage Can With Baking Soda and Vinegar
- Using Vinegar to Clean a Garbage Can: Dosage, Soaking, and Limits
- How Often to Clean Garbage Bins Based on Use and Climate
- Cleaning Without a Hose, Plus Bin Types and Persistent Odor Fixes
- When to Call a Professional Curbside Cleaning Service
- Frequently Asked Questions
Last Updated: October 12, 2026
Why Smelly Garbage Bins Happen and What You’re Actually Fighting
Knowing how to clean smelly garbage bins starts with the cause: bacteria breaking down food residue, grease, and liquid sludge in warm, moist conditions.
Food waste is the fuel, every scrap feeds bacteria.
The fix isn’t masking the smell. It’s removing the food source, killing the bacteria, and drying the bin completely, miss the drying step and odor returns within days.
Odor is a bacteria problem, not a scent problem. Kill the bacteria and remove the moisture, and the smell goes with them.
The Role of Heat, Moisture, and Food Waste
Three things drive bin odor: heat, moisture, and leftover food. Remove any one and the smell drops fast.
- Heat: High temperatures speed up bacterial growth
- Moisture: Standing water and liquid sludge keep bacteria alive
- Food waste: Grease, scraps, and residue feed the whole cycle
A dry, regularly rinsed bin rarely smells, even in July; one with a wet bottom layer stinks year-round.
What You’ll Need Before You Start
Gather your supplies first to keep the job quick and avoid spreading grime around your yard.
- Rubber gloves and old clothes
- A stiff scrub brush or long-handled brush
- Dish soap or a mild cleaning solution
Work outside, on a driveway or lawn, never in the garage or kitchen. You will drip, and you do not want that runoff indoors.
How to Clean a Trash Can in 6 Steps
The fastest way to clean a trash can: empty, rinse, scrub inside and out, disinfect, rinse again, and dry fully in the sun. Skip any step and the odor comes back.
Step 1: Empty the Bin and Scrape Out Food Residue
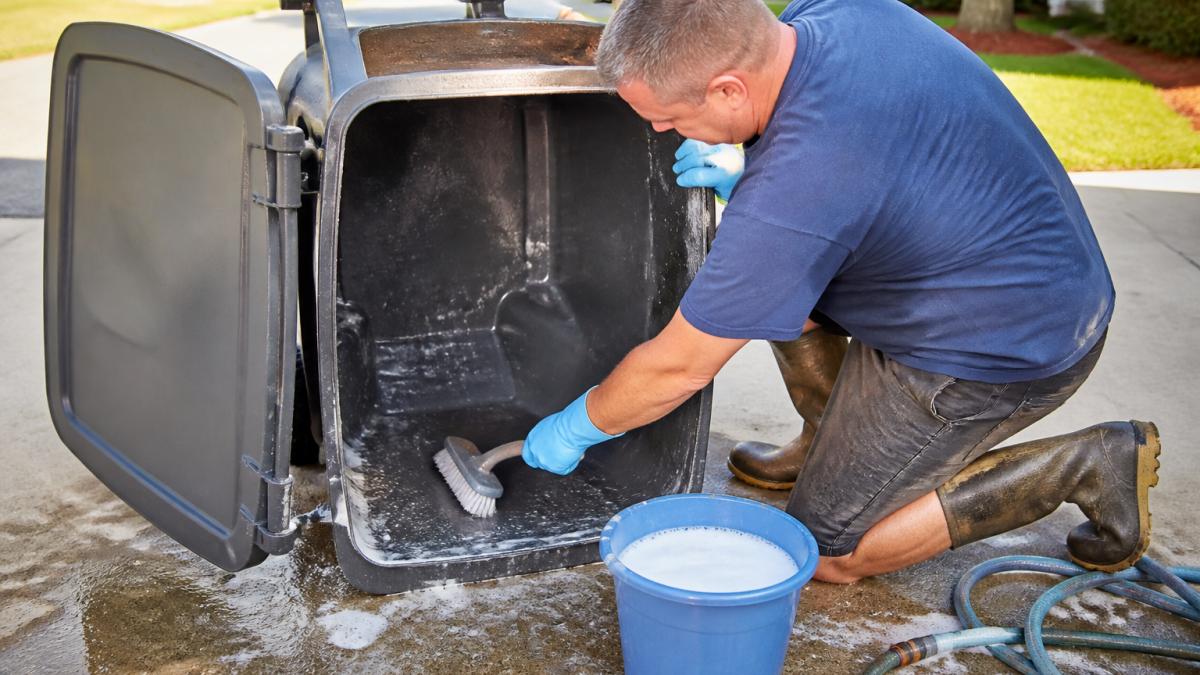
Tip the bin over and dump everything into a fresh garbage bag. Scrape out leftover food, grease, and stuck-on residue with a putty knife or brush edge, over a bag, not the ground.
The bottom collects the worst sludge. Get it out before adding water, wet sludge is far harder to remove than dry scraps.
Step 2: Rinse, Scrub, and Wash the Interior and Exterior
Rinse the inside with a hose to loosen grime, then scrub the walls and floor with dish soap and warm water, working a stiff brush hard into the corners and rim.
Wash the outside too, including the lid and handle, the exterior collects grime and carries odor. Rinse the soap as you go.
Step 3: Disinfect, Rinse, and Dry Completely
Spray the bin inside and out with disinfectant or diluted bleach. Let it sit a few minutes, then rinse thoroughly, leftover bleach or soap can react with the next load of trash.
Stand the bin upside down in the sun to dry completely; sunlight helps kill remaining bacteria. A damp bin smells again within a day, so don’t skip this.
Never mix bleach with vinegar or other cleaners (the CDC). The combination releases harmful fumes. Use one product at a time and rinse between them.
How to Deodorize a Garbage Can With Baking Soda and Vinegar
To deodorize a garbage can, sprinkle baking soda on the dry interior to absorb odors, or scrub the walls with a white vinegar and water mix to neutralize them. Both are cheap, safe, and effective for routine odor control; results come down to concentration, contact time, and rinsing between products.
Here is how to use each with actual numbers:
- Baking soda (sodium bicarbonate): Sprinkle a generous layer, roughly 1/2 cup for a 13-gallon kitchen can, or 1 to 2 cups for a 32- to 96-gallon outdoor cart, across the dry interior. Let it sit at least 30 minutes, ideally overnight, then vacuum or sweep it out and rinse. Replace every week or two between full cleanings.
- White vinegar (5% acetic acid, standard grocery-store strength): Mix 1 part vinegar to 1 part water in a spray bottle for routine wiping, or use full strength for stubborn odors. Spray or pour, let it sit 10 to 15 minutes, then scrub and rinse. It cuts grease and neutralizes odor without harsh fumes.
- Together: Sprinkle baking soda first, then spray with the vinegar solution. The fizzing (acid-base reaction producing carbon dioxide) lifts grime from seams and corners. Let it work 5 to 10 minutes, then rinse thoroughly.
For light odor, baking soda alone is often enough. For a bin that already stinks, use vinegar first, then finish with baking soda.
Never mix vinegar with bleach or with ammonia-based cleaners. Vinegar plus bleach releases chlorine gas; vinegar plus ammonia produces chloramine vapors. Both can cause coughing, burning eyes, and breathing trouble in a confined space. Use one product at a time, rinse the bin between products, and work outdoors or with ventilation.
What Baking Soda and Vinegar Actually Do, and What They Don’t
Baking soda is a mild alkali that neutralizes acidic odor compounds and absorbs some volatile molecules. Vinegar is a weak acid that dissolves grease and residue, and its low pH makes the bin less hospitable to odor-causing bacteria.
Treat odor with baking soda and vinegar and it often returns in two days, the answer is almost always moisture. Residual water in the bottom, under the rim, or in the wheel wells restarts bacterial growth.
Using Vinegar to Clean a Garbage Can: Dosage, Soaking, and Limits
Vinegar to clean a garbage can works best at a 1:1 mix with water for spraying, or full strength for soaking stubborn odors, pour undiluted white vinegar into the bottom and let it sit 15 to 30 minutes for heavy smells.
A few practical notes:
- Dosage: Equal parts vinegar and water for routine cleaning; full strength for soaking
- Soaking: Let it sit 15 to 30 minutes, then scrub and rinse
- Limits: Vinegar is acidic and can dull metal over time, so rinse metal bins well and do not leave vinegar sitting in them
Vinegar isn’t a disinfectant on its own. It handles odor and light grime, but for bacteria you still need a disinfectant step: vinegar for smell, disinfectant for germs.
How Often to Clean Garbage Bins Based on Use and Climate
Most households should clean bins every two to four weeks, but the right schedule depends on use, climate, and odor. In hot weather or with lots of food waste, clean weekly.
| Situation | Cleaning Frequency |
|---|---|
| Indoor kitchen trash can | Weekly |
| Outdoor bin, mild weather | Every 2-4 weeks |
| Outdoor bin, hot weather | Weekly |
| Bin with heavy food waste | Weekly or after each pickup |
| Recycling bin | Monthly, or when sticky |
Simple rule: if you can smell it with the lid closed, you waited too long. Clean it now and tighten the schedule.
Cleaning Without a Hose, Plus Bin Types and Persistent Odor Fixes
You don’t need a hose or outdoor washing area to clean a bin. The bucket method works in an apartment, garage, or shared trash room and uses far less water than a hose rinse.
The Two-Bucket Method for Indoor and Apartment Cleaning
- Fill one bucket with warm water and a few drops of dish soap. Fill a second bucket with clean rinse water.
- Line the floor or a large trash bag with old towels or newspaper to catch drips.
- Wipe the interior with a soapy rag or sponge, working top to bottom so grime doesn’t run back over clean surfaces.
- Rinse the rag in the clean bucket and wipe again. Change the rinse water as soon as it looks cloudy, usually after one or two passes.
- Dry the bin with a clean towel, then leave it open to air-dry completely before putting a bag back in.
Pour dirty wash water down a utility sink or toilet, not a storm drain, curb inlet, or gutter, most municipal storm drains flow untreated to local waterways, and many have ordinances against dumping wash water into them. If you must dump outside, use a lawn or gravel area away from vegetable gardens.
Material-Specific Care: Plastic, Metal, and Wheeled Carts
Different bin materials tolerate different cleaners. Using the wrong one can dull a finish, crack plastic, or start rust.
- Plastic bins (most kitchen and outdoor bins): The most forgiving. Scrub hard with dish soap or diluted bleach (see above) and dry in the sun. Avoid boiling water in thin plastic, it can warp the base and lid.
- Metal bins (stainless steel, galvanized steel): Rinse vinegar off quickly, it’s acidic and will dull or pit metal if left to sit. Dry immediately with a towel to prevent rust, especially along seams and the bottom rim. Avoid abrasive scrubbers that scratch the finish.
- Wheeled municipal carts (typically 32 to 96 gallons): Large, awkward, and often the smelliest because they sit curbside in the sun. Tip the cart on its side on a driveway or lawn and scrub the floor and walls with a long-handled brush. Pay attention to the wheel wells, axle, and underside of the lid, the spots most people skip and where odor hides. Rinse by pouring buckets of clean water down the walls and tipping to drain, then dry upside down in the sun with the lid open.
When the Smell Comes Back: A Troubleshooting Checklist
If the smell returns within a day or two of a full clean, you missed a spot. Work through this list:
- The bottom seam and corners: Sludge pools here and is easy to miss. Run a gloved finger along the seam, if it feels slick, scrub again.
- Under the rim and inside the lid: Liquids splash up and dry there. Wipe with vinegar solution and dry.
- Wheel wells and axles on carts: Grime and liquid collect around the wheels. Scrub with a stiff brush and rinse.
If you’ve worked through this list, disinfected, and the smell still returns within a day, the plastic itself may have absorbed odor over years of use, scratching from repeated scrubbing creates microscopic pores that hold residue. At that point, replacing the bin is usually cheaper and more effective than another round of cleaning.
Prevention Between Collection Days
- Line the bin with a garbage bag and seal food waste in a smaller bag first, especially wet scraps, meat, and dairy.
- Keep liquids out of the bin. Pour grease into a sealed container, not the trash.
- Sprinkle baking soda in the bottom as an odor absorber between cleanings.
A scented garbage bag or bin liner helps, but it covers odor rather than fixing it. Use them alongside cleaning, not instead of it.
The rim, lid, and wheels are the spots most people skip. Odor hides there and spreads back into the bin within a day. Wipe them every time you clean.
When to Call a Professional Curbside Cleaning Service
Some bins are past a DIY fix. If maggots keep coming back, the smell survives a full scrub and disinfect, or you simply don’t want the chore, a curbside cleaning service handles it for you.
At Chester County Clean Cans, we clean residential and commercial bins using 200° hot water that sanitizes, deodorizes, and removes grime.
That’s the real trade-off: DIY costs less and takes an afternoon; a service costs more and takes zero effort, handling the maggot-level jobs most people would rather not face.
Frequently Asked Questions
What can I put in my garbage bin to make it smell better?
An open box of baking soda set on the bin floor absorbs odors between cleanings. You can also drop a cotton ball with a few drops of essential oil into the bin, or sprinkle baking soda directly on the bottom before adding a garbage bag. For food waste, keep scraps in a smaller sealed container and transfer them on collection day. These steps reduce odor but do not replace washing the bin, since bacteria and liquid sludge in the cracks keep producing bad smells.
Does baking soda really deodorize garbage cans?
Yes, for surface odors. Baking soda neutralizes acidic smells rather than just masking them, which is why it works well on leftover food and sour liquid sludge. Sprinkle a generous layer on the damp bin floor, let it sit for several hours or overnight, then scrub and rinse. For a deeper clean, make a paste with water and work it into stains. Baking soda handles everyday smells; a full wash with vinegar or disinfectant is still needed for bacteria and grease.
Can I use vinegar to clean my garbage can?
White vinegar is one of the most effective household options. Mix one part white vinegar with one part water in a spray bottle, spray the interior and exterior, and let it sit for 10 to 15 minutes before scrubbing. The acid cuts grease and kills many odor-causing bacteria. Rinse thoroughly afterward, because leftover residue attracts insects. For heavy odors, use undiluted vinegar on the bin floor. Avoid vinegar on metal bins if you plan to leave it on, since acid can dull the finish over time.
How often should you clean an outdoor garbage bin?
Most households should wash outdoor bins every two to four weeks. In hot weather, or if you regularly toss food waste, grease, or pet waste, clean them weekly. Rinse the bin after every collection day and do a full scrub at least monthly. Indoor trash cans need a wipe-down weekly and a full wash monthly. If you notice maggots, insects, or a smell that lingers after rinsing, clean immediately rather than waiting for the next scheduled wash.
Cleaning smelly garbage bins yourself works fine for routine upkeep, but the worst bins, the ones with maggots and stubborn odor, are hard to fix at home. That is where Chester County Clean Cans comes in. We use 200° hot water to sanitize and deodorize every bin, we finish within 24 hours of pickup, and we offer flexible plans with no long-term contract. Get a quote today and let us take the nastiest chore off your list for good.